Tuesday, December 14, 2010

Merry Christmas to Me!

I went to Joanns the other day to buy some fabric to make a Christmas dress for my favorite little girl.  Their "holiday collection" was %40 off.  I couldn't resist buying some fabric to make a little something for myself. I bought a yard and a half of both green and gray taffeta, originally 5.99 a yard. Oh how I love taffeta...

I bought this pattern a couple months ago when it was on sale for $2 and I've been looking for some fabric to use with it.  The pattern ran surprisingly small.  I've learned the hard way that it's important to measure myself and follow the corresponding pattern size... and I'm glad I did so this time (EVEN IF it said I needed THE BIGGEST size, and even though I was very tempted to use my "better judgement" and do a smaller size). It fits perfectly, but I'm now thinking I'd better make sure I check the measurements before I even buy a pattern. I definitely would have been bummed if I bought a pattern that wasn't big enough.
I really love how it turned out.  It's a bit iridescent, so the picture makes it look purple.... I think/hope it doesn't really look quite so purple most of the time! 
It has pockets, which I love, but I think the best part would be no hem! The band at the bottom is double thickness, so you sew two bands together, iron right-side-out and sew the whole thing to the rest of the skirt.

LOVE IT.

And including the fabric, pattern, and notions, it cost less than $12.

LOVE IT MORE.

Now I'm off to make a little girl dress. And maybe one for her dolly as well.


Wednesday, December 1, 2010

Decking the Halls

 It's starting to feel pretty festive around here.  The tree is up, the lights are on, Christmas music is playing, and we've got some of the greatest snow on earth accumulating outside.
Holiday Berry
While thumbing through last year's December Volume of Better Homes and gardens, I saw this patterned wrapping paper, paired with this wrapping paper in "pool"  and red and fell a little bit in love.  So I decided to change up my usual red-green-silver holiday decor and add some blue and brown. 

Last year I bought this wrapping paper in green, and after seeing the BHG wrapping paper I had been hoping to find it in blue.  I bought the green stuff at the grocery store in town, and I don't even know who makes it. Luckily for me, they still had some in blue, and it was half off! Score.
 Our tree was cut fresh from Jonny's parents' property up the canyon.  This is the second year we've elected to go with a miniature version on top of the mantle... I mean entertainment center.  We were crunched for space last year, and although there is more room now, we thought it would still be a good plan due to the fact that our almost-two-year-old is INTO EVERYTHING.  I have to say I absolutely LOVE our tree.  It's perfect.  And it's got all the things I think every good Christmas tree needs. (Minus the lights... once I strung them, you couldn't see the poor little branches anymore.  So I bagged the Christmas tree lights and taped some to the back of my empty blue picture frame instead.)


But like I was saying... All the things a great Christmas tree needs:
Some pretty Christmas balls (get them at Michaels or Joanns with a coupon and they're super cheap).

Some handcrafted goodness- I made the garland with jute cord and wooden beads.


A little sentiment-those silver things are old fishing lures that used to belong to Jonny's grandpa.  His brother(who shall remain nameless) did a little man-craft and turned them into ornaments for all of us. I love them because they have a special meaning, and because they match my other ornaments so well! There are a few that don't match as nicely... they're on there too, just a little harder to see :)  My mom hangs our old ski passes on her tree. They're unique to our family and it's fun to look at all our old pictures.
And of course, some bling.  The sparkly buttons came from Grandma Carol. They aren't exactly a special heirloom entrusted in my care, in fact, I acutally bought them from her. It's a funny story and it makes me smile every time I look at them.  Also found hanging on the tree- a prism from my mom, a snowflake crystal I bought to hang in the rear view window of my first vehicle, and some jewelry from my grandma. Sparkly AND sentimental.
 
And there's a little birdie sitting under the tree.  I bought him at the dollar store. No sentiment, just cute.


And since we don't have a mantle, or any other horizontal surface for that matter, I made a swag from which  to hang our stockings.

I used some sticks I picked up on a walk up the creek and the leftover boughs from our tree.

I attached the biggest boughs with floral wire and then added the sticks.  Then I added the smaller boughs and used them to hide all the wires.

I hung our stockings on another stick and attached it with some jute cord.  I used the tails of the cord to make loops that I hung on the hooks on the wall.  I think it could use a bow or some red berries to spruce it up a little.  I'm sure that will happen sometime in the near future.


Last but not least, the sleigh bells hanging on our door.  They were made by Grandpa Ike and they're so fun and festive!

Monday, November 8, 2010

Pray for Snow

I have to admit I've been dreading the cold weather ever since it left.  Summer was SO nice, and it has been so fun to play outside.  With the cold weather looming in the near future, all I could think of is wet feet, dirty floors, snowy roads, slushy sidewalks, and the hours and hours I'll spend dressing and undressing a certain little girl in and out of her snow clothes.  But the last couple of weeks I've been getting really, REALLY excited for winter. Crazy right? And I've begun to remember why I LOVE winter.

I love skiing, crocheted hats, cocoamotion, Christmas trees, Beaver Mountain, knit gloves, being able to bake without dying from the heat, skiing backwards, Bogus Basin, wrapping paper, ski coats, cold air, warm food, Christmas tree ornaments, skiing on Christmas day, blankets, sweatshirts, long sleeve T-shirts, all things glittery, snowflakes, fudge, snowmen, my crazy goggles,  and skiing with my favorite guy!

I may need to re-read this post come the end of February... but for now, I do love winter and I'm SO excited for Christmas. Pray for snow!

Thursday, November 4, 2010

Help!

I made this fruit for The Girl a few months back, and I love it.  I've been planning to make her some more for Christmas to go with the homemade kitchen I hope to finish.... 

DUKTIG 14-piece vegetables set  DUKTIG 9-piece fruit basket set  DUKTIG 15-piece breakfast set

Then, a few days ago, I found this food at Ikea.com. And it's Super Cheap. $8 for the veggies, $8 for the fruit basket, and $5 for the whole breakfast set.

So I have a dilema.

Do I buy fabric, make patterns and sew together a bunch of food (keeping in mind that it IS fun, and I'm quite fond and proud of the fruit I've already made, but there is ABOSULTELY NO CHANCE I'll be making a bunch of grapes, and I still have at least 12 other Christmas Gifts to figure out).

OR do I spend a quick $21 and save the time and effort?

It's called Opportunity Cost (thank you ECON 1500...).  What do YOU think?

Wednesday, November 3, 2010

To Do:

I bought this fabric a couple months ago, intending to make a quilt for our bed.... I KNEW it was going to be too girly for the husbands taste, but hoped that somehow I could get away with it. Not a chance. So it's been sitting in a bag ever since I brought it home, and I can't decide what I'm going to do with it.

Monday, November 1, 2010

Snow White Costume


Here is the final product. Unfortunately I never got a really good picture (too much dancing around and singing "ha ha ha" going on). I covered her fair little head with a black hat and added a headband.


I used a pattern that I've already made two other dresses with, so it all went pretty fast. I just had to modify the bodice and sleeves and make the skirt a little longer.


I spent about $8 and a couple hours making her Snow White dress. While one purchased at Walmart or on the internet would cost between $19 and $45. I think it was well worth the time I put into it!


Not to mention my skills as a seamstress are improving all the time.... Just look at the progress I've made with zippers!

Thursday, October 28, 2010

Etsy

I'm slowly but surely getting my shop back up and running. I have A TON of hats and headbands sitting around needing an owner to keep warm. They're too cute to be hiding in my closet! Go check it out.

Monday, October 25, 2010

How to Train Your Toddler?

So she pooped in the toilet tonight. She said "mommy potty," so we went in and put her on the toilet and she pooped. Pretty cool. Maybe I'll get lucky and she'll just potty train herself. Bad news is I still have about a thousand diapers in the closet....

Wednesday, October 20, 2010

Snow White


The Little Girl has recently discovered movies and she LOVES "No Wite." So naturally she needs a Snow White costume for Halloween.... I bit the bullet and bought fabric to make her a dress.
I've already run into some issues, but thats just how projects seem to work for me. I started putting it together last night and I'm really excited to see how it turns out. Wish me luck!

Saturday, October 16, 2010

Quilty Stuff

I said before that I was making my first "real quilt," which meant that it wouldnt not be made out of denim, and would be more complicated than sewing a bunch of squares together.

While making a quilt out of diamonds happens to be very similar to sewing together hundreds of square pieces of fabric... it was indeed more complicated.

I quickly learned that I couldn't just line up the edges and sew them together. When I tried it, my diamonds ended up offset, the long edges of the chain of diamonds didn't match up. In order to get them to line up straight, I had to offset the diamonds when I sewed them into strips. I realize I could have made this step easier by strategically snipping off the points in just the right place, however, after cutting all those diamonds, I didn't want to go back and trim them up, and the points actually proved to be helpful when sewing my strips together.

I ironed the seams toward the gray fabric, and the points poked out like so.
I figured out that if I matched the corners up....

And pinned them together before I sewed the strips, the intersections on my diamonds matched up and looked so much cleaner. And it was much quicker than the guess and check (and then pick out a whole row) method I was using before.
I'm sure anyone with more sense than me would have done some reasearch or consulted an expert for advice. I, on the other hand, tend to do things the difficult way and just figure it out myself. Think I'll ever learn?


Thursday, October 14, 2010

Women's Shirtdress to Little Girl Shirt AND Dress

I bought this shirt/dress on my way out of Walmart a few months ago. It was on clearance for $3. It was cheap, and I was done shopping, so I didn't bother to try it on. When I got home, I discovered that it was too small. This week I finally found the time and courage to refashion it for The Little Girl.

I cut about a foot off the bottom, took in the sides and the top, shortened the straps, and added a ruffle to make this cute little dress.

It's great for picking flowers,


playing in the yard,

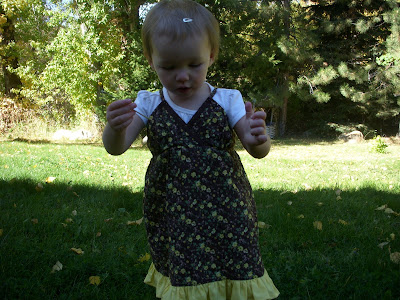
and posing for pictures!

I used the fabric left over from the bottom of the dress to make this little top.

I had planned on posting step by step instructions, but I made a few mistakes, and had to do some very fussy cutting, and strategic pleating and gathering in order to get it to work out. It isn't what I picturing in my mind, and I know it shouldn't have been as difficult as I made it, but nevertheless, I like the way it turned out.


How cute are those little sleeves?

I also made her skirt from an old pair of my pants, and I love the way it turned out. I WILL put together a tutorial for it sometime in the future....

I'm entering this project into a crafting contest over at Sew Dang Cute. Go check it out!


Tuesday, October 12, 2010

Case Lot Clutter


So I hit up the Case-Lot sale at Maceys, and came home to discover that I had nowhere to put my newly acquired foodstuffs. So... I had to clean out the shelves in our storage room (which I've been meaning to do for months, of course).
The whole room is now fairly clean and organized. With a place for everything and nowhere to put anything else! I have no idea where I'm going to put the 10 boxes of diapers that are still in the back of the Jeep....

Monday, October 11, 2010

Little Birdie Pillow


This pillow was inspired by this tutorial on UCreate. I didn't follow the tutorial much, but I did steal the idea. I used regular acrilic paint for the branches (works fine, but I think it would lay a little nicer if I hadn't applied it quite as thick), and the leaves are leftovers from this project, and I used the pattern from my little birdie magnets for the bird . I ironed them down and sewed around the edges.


I cut up an XXL shirt that I bought super on sale at Old Navy. It worked out perfectly, because I didn't have to add any buttons or zippers or flaps... I just cut out a square from the front and the back and sewed them together.

It turned out a little too girly to get to live on the couch, but I found it a happy home in The Girl's Room, and she loves it. Now that she's closing in on 2 years, her room is almost decorated to my(I mean her...) liking!

Saturday, October 9, 2010

Quilting Endeavors


So the quilt top is finished (I couldn't get my picture to turn right-side-up). Actually, the back is also finished, and I've begun to quilt it. That part... not going so hot. We'll see how it turns out....

Thursday, October 7, 2010

Diapers Coming Out My Ears

So we happened to be in Sam's Club yesterday,waiting for the car guys to balance our tires. We were wandering around killing time, when a woman with a cart FULL of boxes of diapers stopped us as she walked past. She said that Pampers Cruisers were on sale for $8. She also said "my kids don't even wear diapers anymore, but it's such a good price, I had to buy some, I'm sure someone I know can use them."

As we walked over to the diaper section, I tried to do the math in my head. It made absolutely no sense. I was pretty sure even the smallest package of Pampers costs more than $8 (wasn't positive, because I don't usually spring for name-brand diapers).

Sure enough there were 160 ct boxes of pampers diapers for $8 each. They originally cost $38. I still couldn't fathom it. I just stood there staring for a while, occasionally adding a box to my cart.

More and more women were beginning to congregate in the diaper aisle. They began to fill their shopping carts full of diapers, even if they didn't have a child to put inside all those diapers. One woman was wearing a blue tooth earpiece, calling all her friends, taking their diaper orders. Another woman, whose cart contained two children and two giant bags of tri-colored rotini began to fill her cart full of diapers. There were women everywhere, talking on the phone, loading their shopping carts full of diapers, it was near pandemonium.

A man walked by to tell us that there were Snickers and M&Ms on sale on the next aisle. Boxes of 24 ct Snickers for $2.48. THAT'S 10 CENTS A BAR. 45 oz boxes of M&Ms for 1.83. My heart began to race. Seriously. I felt so silly. But I got over it and grabbed a few boxes of Snickers and a couple bags of M&Ms.

I texted a friend and called my sister-in-law to see if they wanted me to get them some very cheap diapers and went back to grab a few more boxes. By then, the stack of diapers had been greatly diminished. Blue Tooth was filling her second cart, her poor kids trying to find room to sit in their cart with all those boxes. Tri-colored Rotini was also filling her second shopping cart. Another woman kicked and shoved one more box into the undercarriage of her cart. The aisle was packed with women on their cell phones talking a mile a minute grabbing boxes and boxes of diapers. I can only assume that their hearts were also racing from the adrenaline rush of snagging such a sweet deal. I snatched the last three boxes of size three diapers for my sister-in-law, still dumbfounded, hoping I was buying enough.

The checkout line was just as chaotic. Just imagine loading two shopping carts full of diapers onto that conveyor belt whilst being hopped up on adrenaline. I have to say I felt bad for the checkers as the crazy diaper-buying women came through the line.

We left the store with 12 boxes of diapers, 2 great big bags of M&Ms, and 5 boxes of snickers. That's right. I bought 120 Snickers bars yesterday. As we drove home, my heart was still racing. We speculated: Is this some sort of social experiment? Were we being video taped? And what's the catch?

Well... the Snickers are all nuts and caramel-no nougat (I might like them better that way), and the M&Ms are limited edition "team color" red and white (maybe from the super bowl?) but they still taste fine.

As for the diapers, I still haven't figured it out. But I'm feeling pretty fortunate. I bought 450 dollars worth of diapers for 96 bucks. And my Little Lady is sittin pretty in her fancy new name-brand diapers. Ka Chow.

Now I just have to find a place to put them....

Friday, October 1, 2010

Amy Butler Inspired Fabric Leaves


I made these fabric flowers for The Girl's room. They were made from scraps of fabric from another project and were inspired by this pattern from Amy Butler found here.

Want to make your own?
You will need:
Twigs, sticks, or fake flower stems (I bought mine at the Dollar Tree)
Scraps of Fabric
Heat-n-Bond fusible interfacing


First, I laid out the fabric scraps on my ironing board, right side down, on top of tissue paper (to keep the interfacing from getting on my ironing board and mucking up my iron).


Then, I cut out a piece of interfacing to fit over the fabric scraps, and ironed it on according to the directions on the package.


It looked like this when I was done. While the paper backing was still attached, I cut out leaf shapes from each little scrap.


I ended up with this pile of leaves.


Next, I peeled the paper off each leaf, and sandwiched the end of the stem between two leaves. Then I ironed them together, and trimmed off the excess fabric sticking out (this was the time consuming part).


After much ironing and trimming this was the end result. Perfect for Her room!


Although I made the "greenery" for The Girl's room, they were so fun and Springy that they've been on our entertainment center since Easter.


I love the way the fabric leaves turned out, but because I just eyeballed it when I cut them out, they were pretty irregular which made for a lot of trimming. I tried it again, this time using card stock, hot glue, and a stencil. It was fast and easy. Both methods turned out great. The fabric leaves are definitely my favorite and totally worth the time, but I don't know if I would be inclined to do it again.