Showing posts with label sewing. Show all posts

Thursday, April 21, 2011

Shoe Clips for Easter

DSCN3066
I bought some little white shoes to go with a little Easter dress for my little girl.  I mostly love these shoes, but the butterfly is just a little too cheesy. And not-butterfly looking.
DSCN3044
So I made some little flowers to clip on instead.
Want to make your own shoe clips?
To make two flower shoe clips you will need a needle and thread, fabric, two alligator clips, and a hot glue gun.
DSCN3021
First cut about 20 2in squares from your fabric.  They don’t have to be perfect squares, as long as they are generally square-ish.  I used a shirt I bought on clearance for some crafty purpose. I THINK it’s chiffon.
DSCN3022DSCN3023
Then fold each square into quarters to make a smaller square.  Holding the folded corner between your fingers, cut off the all four corners at once with a rounded edge.
DSCN3024DSCN3025
When you unfold your square, you will get what looks like a flower with four petals.
Do this with all of your fabric squares. Each little flower will become one petal in your bigger flower.
DSCN3026DSCN3027
Next, take your first flower and fold it in half, but do it a little skeewampus, so the petals don’t line up perfectly with each other.  Then fold it in half again to make a right angle.
DSCN3028DSCN3029
Take your needle and tread and go through the point a couple times to hold it in place.
DSCN3030
Fold the next flower into a petal the same way you did with the first. Than lay it on top of the other petal, points together, but skewed a little to the right. Pull your thread through to hold this petal in place.
DSCN3031
Do the same thing with the next petal on the opposite side of your first petal, skewed to the opposite side. Pull your thread through again.
DSCN3032
At this point your flower should have three petals and look somewhat like this.
DSCN3033
Turn your flower so the folded edge of the first petal is showing (sorry the picture is a bit blurry). Add the next petal here, and the one after that on the opposite side.  Then add more petals to fill in any gaps or holes until the flower looks round. I used 9 petals in each flower.
Make sure to attach one petal at a time with your needle and tread, and keep all of the points in the same general area.
DSCN3038
Your flower should look similar to this one.
Make one more.
DSCN3039
Then hot glue a clip to the back of each flower, and be prepared for some seriously cute shoes.
DSCN3044

Tuesday, December 14, 2010

Merry Christmas to Me!

I went to Joanns the other day to buy some fabric to make a Christmas dress for my favorite little girl.  Their "holiday collection" was %40 off.  I couldn't resist buying some fabric to make a little something for myself. I bought a yard and a half of both green and gray taffeta, originally 5.99 a yard. Oh how I love taffeta...

I bought this pattern a couple months ago when it was on sale for $2 and I've been looking for some fabric to use with it.  The pattern ran surprisingly small.  I've learned the hard way that it's important to measure myself and follow the corresponding pattern size... and I'm glad I did so this time (EVEN IF it said I needed THE BIGGEST size, and even though I was very tempted to use my "better judgement" and do a smaller size). It fits perfectly, but I'm now thinking I'd better make sure I check the measurements before I even buy a pattern. I definitely would have been bummed if I bought a pattern that wasn't big enough.
I really love how it turned out.  It's a bit iridescent, so the picture makes it look purple.... I think/hope it doesn't really look quite so purple most of the time! 
It has pockets, which I love, but I think the best part would be no hem! The band at the bottom is double thickness, so you sew two bands together, iron right-side-out and sew the whole thing to the rest of the skirt.

LOVE IT.

And including the fabric, pattern, and notions, it cost less than $12.

LOVE IT MORE.

Now I'm off to make a little girl dress. And maybe one for her dolly as well.


Wednesday, November 3, 2010

To Do:

I bought this fabric a couple months ago, intending to make a quilt for our bed.... I KNEW it was going to be too girly for the husbands taste, but hoped that somehow I could get away with it. Not a chance. So it's been sitting in a bag ever since I brought it home, and I can't decide what I'm going to do with it.

Monday, November 1, 2010

Snow White Costume


Here is the final product. Unfortunately I never got a really good picture (too much dancing around and singing "ha ha ha" going on). I covered her fair little head with a black hat and added a headband.


I used a pattern that I've already made two other dresses with, so it all went pretty fast. I just had to modify the bodice and sleeves and make the skirt a little longer.


I spent about $8 and a couple hours making her Snow White dress. While one purchased at Walmart or on the internet would cost between $19 and $45. I think it was well worth the time I put into it!


Not to mention my skills as a seamstress are improving all the time.... Just look at the progress I've made with zippers!

Wednesday, October 20, 2010

Snow White


The Little Girl has recently discovered movies and she LOVES "No Wite." So naturally she needs a Snow White costume for Halloween.... I bit the bullet and bought fabric to make her a dress.
I've already run into some issues, but thats just how projects seem to work for me. I started putting it together last night and I'm really excited to see how it turns out. Wish me luck!

Thursday, October 14, 2010

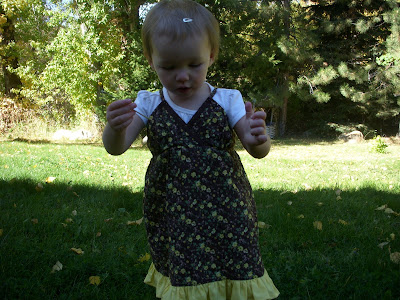
Women's Shirtdress to Little Girl Shirt AND Dress

I bought this shirt/dress on my way out of Walmart a few months ago. It was on clearance for $3. It was cheap, and I was done shopping, so I didn't bother to try it on. When I got home, I discovered that it was too small. This week I finally found the time and courage to refashion it for The Little Girl.

I cut about a foot off the bottom, took in the sides and the top, shortened the straps, and added a ruffle to make this cute little dress.

It's great for picking flowers,


playing in the yard,

and posing for pictures!

I used the fabric left over from the bottom of the dress to make this little top.

I had planned on posting step by step instructions, but I made a few mistakes, and had to do some very fussy cutting, and strategic pleating and gathering in order to get it to work out. It isn't what I picturing in my mind, and I know it shouldn't have been as difficult as I made it, but nevertheless, I like the way it turned out.


How cute are those little sleeves?

I also made her skirt from an old pair of my pants, and I love the way it turned out. I WILL put together a tutorial for it sometime in the future....

I'm entering this project into a crafting contest over at Sew Dang Cute. Go check it out!


Saturday, April 3, 2010

Fancy Baby Socks Tutorial

I recently bought Little Miss an Easter dress (I resisted the urge to make yet another dress out of the same pattern as all her others...) and I couldn't help but buy some little white shoes to match. She's going to need something to match her fancy dress for my brother-in-law's wedding anyway... So that makes it a thrifty purchase, not an impulse buy... Right?


Bad news is they're a little too big to wear with bare feet or tights. She needs a pair of socks on her little fit to make sure her shoes stay on. Now i know that you can just buy fancy socks with little ruffles on them, but I was feeling too cheap and lazy to go to every store in town to hunt down a pair. SO... here's how I fashioned a pair on my own:


You'll need: One pair of socks, some tulle (ribbon would work too), a needle and thread, and a sewing machine.


Start by cutting two strips of tulle. Mine were 2 inches wide by about 20 inches long. You can change these measurements to change the way the socks look. If your strip is wider, the ruffles will be longer. The longer your strip is, the more fluffy your ruffle will be.


**The strip should be AT LEAST twice as long as the circumference of the ankle of the sock. My socks were about 5 inches around, and my strips were 4 times as long.


Next, fold strip in half, and baste along the raw edges.


It will look something like this.


Next, pull string to gather until ruffle is the same length as the circumference of the sock. Pin ruffle to sock, all the way around (use more pins than you see in the picture).


Run through the machine on a stretch stitch. This is the stitch I used.

** It's important to use a stretch stitch... if you don't the sock won't fit around her little ankles.


Originally i wasn't sure what I was going to do about the raw edge after I sewed the tulle to the sock. Fortunately, the stitch secured the tulle really well and covered most of the edges. I just trimmed the bits that were still sticking up above the stitch.


All Finished!

**I had planned to try and figure out something to cover the edge of the tulle/stitching. But I think that the stitch I used looked okay all by itself. Just try to pick the cutest stretch stitch on you're machine and you'll be good to go. If you're feeling really ambitious you could also sew on some beads or sequins or other trim.


How cute are these fancy feet!


Friday, March 12, 2010

Sewing Machine Woes

My sewing machine and I have a sort of love-hate relationship... I love it, but I think it might hate me. Never seems to work when I need it to. It randomly freaks out when I'm in the middle of a project, and often refuses to get up and going at all. Sounds more like a grumpy teenager than a simple piece of machinery.

Such was the case earlier this week. I sat down to sew one very simple straight seam. Just one. But my machine (I think she needs a name...) refused to work. I turned in off and back on. I switched the stich. I switched back to my original stitch. Tried all the easy things I could think of. Nothing.

So I decided to break out the big guns. I got out the screwdriver and started taking things apart. (I'm sure my mother is cringing right now... we won't talk about all the other things I've taken apart and ruined...) So I went about dismantling and cleaning and tweaking. I put it all back together to give it another try. No good. I tried a new bobbin, still nothing. And then I ran out of time and decided to come back to it later.

So yesterday, I came back to see if I could make the darn thing work. I took it apart a few more times, and cleaned an oiled and blah blah blah. Finally, put it all back together, and as a last ditch effort, decided to rethread the blasted machine.

It worked. Stupid machine.

The moral of the story? Be nice to your sewing machine, and don't forget to try rethreading it before you bust out the hand tools.

And now that it's up and running again, I hope to have a cute little project up in the near future.