Tuesday, November 22, 2011

Baby Quilt

This little beauty:


Recently came in the mail (the quilt of course... not the baby) from my sister-in-law.

I. Love. It.

It's perfect for playing on the floor, and it will look great in the girl's bedroom.


This little girl likes it too.  Though you may not guess that by the number of times she's puked on it... :)

Thanks Abby!

Tuesday, October 11, 2011

She's Here!


Baby Sister was born two weeks ago. 
She weighed 8 lbs 6 oz and was 21 inches long.

We are loving having this sweet little girl around. I forgot what it's like to have a tiny person around....  We spend a lot of time snuggled up on the couch watching movies, and much less time doing things like sleeping or cleaning or cooking.

Crafty projects are pretty non-existent at the moment.  The budget is tight, my sewing machine is broken, and I'm busy snuggling a baby :)  But I've got a few ideas swirling around in my head, and I'll be sure to post them if/when they happen!

Wednesday, September 7, 2011

We're finally semi-settled here in Pennsylvania. 

So far, I have a love/hate relationship with the humidity.  When it's cool and breezy, I really love it....  But when its hot and sticky and smothering... I really really hate it. Especially at night when I already have trouble sleeping comfortably. The good news is we haven't had too many of those awful hot nights, and the AC does the trick during the day.

The trees in PA are amazing.  They're thick and dense and all over the place.  I'm used to seeing lots and lots of pine trees, but these green leafy trees are just too cool. I can't wait until they start turning colors this fall. 

I really like our new place.  I have a dishwasher and garbage disposal, and a new washing machine is going to be delivered today.  I can't wait.

We're a little short on storage options, but there is a ton of space to decorate and add furniture.  My handy husband built us a table and a bench and I LOVE them (pictures to come later). I'm really looking forward to prettifying our home, but due to the lack of time, energy, and cash flow I expect in the next few months, it may be a while before that happens.

Driving in the place is a different story.  Oh how I miss the nice square, North-South East-West running, numbered streets of Utah.  I remember thinking they were boring and lacked character when I first moved to college.  I was wrong.  Genius, is the best word to describe that grid system. Genius.  It's so much more complicated finding my way around this place.

Not to mention the lack of elevation in this place. With no mountains to use to orient myself, the driving issue is only compounded.

Overall, I'm really excited to be here.  I can't wait to get settled in a little more and have some routine to my life again.  The husband started school today and baby sister should be here within the next month. I CAN'T WAIT to be not pregnant, and I'm nervous and excited to have a new little girl in the house. But I still have so much to do! (like maybe buy some diapers that will fit the poor girl)

Thursday, August 11, 2011

Big things to come

I'm still prgnant,
it's still hot,
I still live in not my own house,
and I keep pushing the buttons on the laptop with my ever-growing belly every time I lean forward. 
Awesome.

Someday, hopefully not too far from now, all will be back to somewhat normalness.
Except for the part where we'll be living in a new strange, cold, humid place and learning to live with a newborn again.
Wish me luck!

Monday, July 11, 2011

Can't Beat the Heat...

So I've been feeling significantly less than motivated these days.  I think I'll blame it on the heat.  I really hated the long, cold, wet spring we had, but now I'm missing it. And feeling grateful it lasted as long as it did. And wishing it would come back. 

I've got all kinds of things I need to be doing. Important things, like finding a place to live and potty training a little girl and exercising.

I also have lots of things I SHOULD be doing. Like laundry, and getting ready to move and keeping the little girl out of grandma's makeup.

I even have things I'd like to be doing. Like sewing or visiting my friends before I leave.

What HAVE I been doing?

I've been playing a lot of tetris. And doing puzzles on the internet. And wandering around the house. And snacking on stupid things because I'm too lazy to find something good to eat.

Oops.

I even made a list today. That usually helps me accomplish things.  So far, I've crossed off one item of business.

Maybe my list was just too long.

Maybe I need more sleep.

Maybe it's just too dang hot.

Thursday, June 23, 2011

Smocked 4th of July Dress

 Last week i got to be a guest blogger on Running with Glitter. I made this smocked 4th of July dress for the little lady. Today, I'm sharing the tutorial with you!


Whenever I make clothing from scratch, I like to use an existing piece of clothing to get my measurements. The dress I made is size 2T-3T. All measurements given will yield a dress in that size.  if you plan to make a different size dress, adjust your measurements accordingly.

To make this dress, you will need:

1/2 yard each of two different fabrics (that's 1 yd total)
1/2 yard 1/4 in elastic
elastic thread (find it with the other elastic, not with the thread)
coordinating thread
.... and a sewing machine and iron of course :)


First, cut the bodice fabric into two 6 in by 20 in rectangles.


Then, measure 4 in down and 2 in toward the middle and cut the top corners off on a diagonal. A rotary cutter and straight edge come in handy for this part.


Then, using your scissors, round the cut, taking out more fabric toward the bottom.  Fold the piece in half and match the cut on the other side, then use the first piece as a guide to cut the second.  These cuts will form the arm holes.


Next, using the second fabric, cut two 12 in by 20 in rectangles to form the skirt pieces. I planned to add a ruffle, (I just can't help myself) at the bottom of the skirt.  If you do not want a ruffle, you may want to lengthen this piece by a few inches.

Using the same fabric, cut two 1.5 in by 20 in strips. These will be used to make the straps.

From the fabric you used for the bodice, cut two 3 in by 40 in strips for the bottom ruffle.

Fold the top edge of both pieces of the bodice toward the wrong side and iron flat.


Then fold it over again, approximately 3/8 in, and iron flat. This will create a casing for the elastic.


 Sew down using a seam slightly less than 3/8 in (but more than 1/4 in) to create the casing.


I used French seams on this dress. This step is optional, but it creates a nice finished edge on the inside of the dress, and will make the seam a little stronger.  To do this, place the bodice and skirt pieces on top of each other with WRONG sides together.  Sew together using a 1/4 in seam allowance.


Open the pieces, and fold over the other direction so that the RIGHT sides are facing each other.  Iron the seam flat.


Then sew along the same seam, using a slightly larger seam allowance.


 When you open it up, it will look like this.

*** NOTE: iron the seam toward the SKIRT piece.  Not the bodice piece like I did.  It didn't work well, and i had to use some fancy footwork to fix it.***


 After you have sewn both bodice pieces to the two skirt pieces, you should have two pieces that look like this.  Pin the two pieces together, matching the seams, and sew the sides together with a French seam, the same way as before.


Press the seams toward the back panel and and top stitch to hold the seam down.


Load your bobbin with elastic thread.  Make sure not to stretch the elastic as you load the bobbin.  You can wind it by hand, or do it on the machine, but hold the elastic spool in your hand, so that the elastic doesn't stretch as it loads.  Insert the bobbin into your machine like normal. 


To create the smocking, simply sew straight, evenly spaced lines (mine were about 1/2 in, the spacing is up to you.  The closer they are together, the longer the smocking will take.) across the bodice using a long (I used the longest) stitch length, making sure to backstitch at both ends.


The first row will only gather the fabric slightly. Don't worry, keep going.


Continue sewing one row at a time, until you reach the bottom of the bodice.


Sew one last row, with the elastic still in the bobbin, right up against the skirt piece.


The smocking will look similar to this, but the top edge will be ruffled.  Cut 1/4 in elastic into two 7.5 in pieces. Thread elastic through the casing and secure with a short zigzag stitch at each side. You can also do this before smocking the bodice.

After washing the smocking will bunch together even more.  Don't worry if it looks like the dress will be too big, it will shrink up after it's washed and dried.


Next, iron the 1.5 in strips to be used for the straps in half lengthwise.


Then fold each side toward the middle and iron the crease.

 Your two straps will look like this.

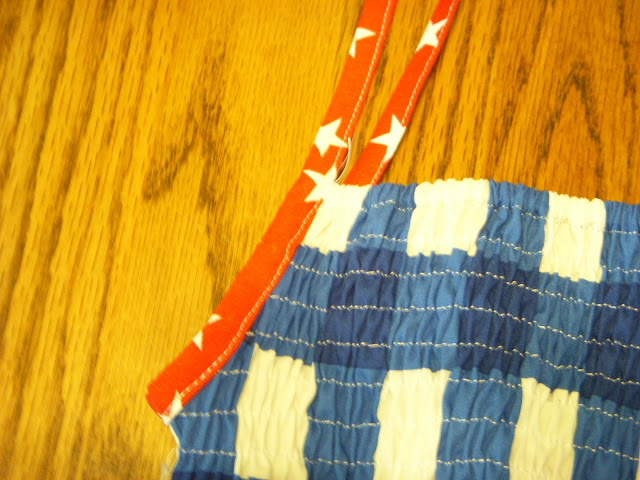
Pin the strap around the rough edge of the arm holes, with the middle fold facing out, to create a binding around the edge.

Sew the entire length of the strap, close to the open edge. This will create a strap above the bodice, and bind up the raw edges of the arm holes.


Lastly, attach the ruffle. Sew together the short ends of the two 3 in by 40 in strips together. 


Hem the bottom edge, and use a long running stitch with low tension on the top raw edge. This will be used to gather your ruffle.


Pull on the bottom thread to gather the ruffle, then pin to the skirt, right sides together, evenly distributing the ruffles across the width of the skirt.  Use lots of pins. Sew down, remove the pins, and pick out the running stitch.


Lastly, I turned the seam toward the skirt, and top stiched it down.


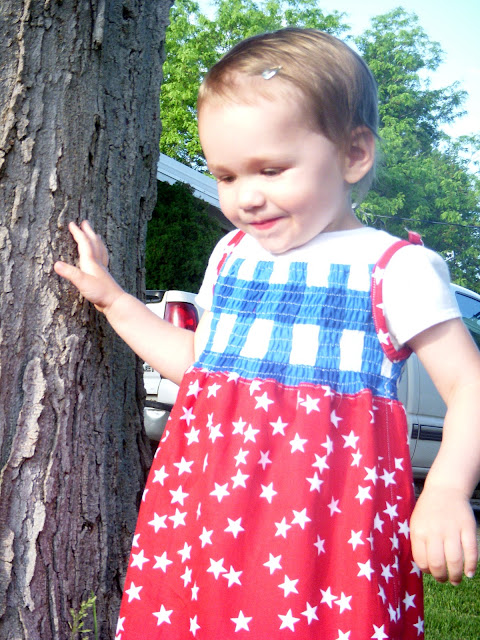
Tie the straps at the shoulders.  It helps to have a model, but you can also use another dressg as a guide, or just wait until you have the new owner present. I also trimmed  the ends shorter after tying the knots.


And then take some pictures!


I think she likes it!


And I KNOW I Love the ruffle!

Thursday, June 16, 2011

Guest Blogging Today!

Today I'm guest blogging over at Running with Glitter.


It's my first ever guest post and I'm sharing a tutorial for this little dress. Go check it out!

Tuesday, June 7, 2011

New Etsy Shop

In an effort to simplify things, I have created a NEW Etsy Shop.  
Drawstring backpacks are IN STOCK! Go check it out: www.notverydomestic.etsy.com.

Tuesday, May 31, 2011

Knapsack WINNER!

Thanks to everyone who entered my giveaway! The winner is....

#9 Amber!

AMBER said...


What a cute idea. One day I will try my hand @ sewing. Love the ruffles though! I am a follower now :)
Amber

Congrats Amber! Please email me with your contact information and I'll get your prize in the mail.

Saturday, May 28, 2011

Housekeeping

Ah! I'm so excited about all the great feedback I got from my Ruffled Knapsack Tutorial.  Thanks to everyone who commented, those who became new followers of Not Very Domestic, and especially to those who have featured me on their blogs. Go check them out:


If you haven't already, don't forget to go enter the Knapsack Giveaway which ends Monday evening.

Things around the blog may be pretty quiet for a bit. We're going to spend the next couple months hopping between our parent's houses before we move to PA at the end of the summer. We've spent the week moving out of our apartment, and there is still lots of cleaning to do.  I spent an hour and a half cleaning blinds today and my fingernails are brown, gross.

While packing things up yesterday, Mr. Domestic had the opportunity to see first hand how much "crafty crap" (I think that's a direct quote...) we actually own.  So in order to avoid packing all that crap across the country (and thus creating unwanted friction the in marital relationship), I'm going to try to use the next few weeks to diminish my crafty pile, and make some cool stuff in the process.  You may even see the etsy shop stocked once again :)

Have a great rest of the holiday weekend, and don't forget to enter the giveaway.
Thanks again to all of you!

Friday, May 20, 2011

Ruffled Knapsack Tutorial

** Thanks for coming to check out this tutorial!  I hope you have lots of fun with it :)  However, if you're feeling less-than-crafty, I've done all the hard work for you! You can go check out my Etsy shop and buy one ready made!**

Again I spent the day doing something other than packing like I should be. I think it was worth it…

Tada!

DSCN3186
A drawstring knapsack with the cutest little ruffles.

Want to make your own? Here’s how:

You will need:
(1) 10 in. by 24 in. piece of canvas or other sturdy material
(3)  2 in. by 15-20 in. strips of contrasting fabric
(2) grommets (and a grommet tool)
(2) pieces of 44 in. long cotton or nylon cord (you will need to fit 2 strands of cord through the grommet, make sure they’ll fit)

* These measurements are for a toddler sized knapsack.  haha… don’t try and fit into this one yourself : )

DSCN3147        DSCN3148
Fold canvas in half (hamburger style) wrong sides together and crease the fold with your iron like so.

DSCN3151
Cut three 2 in. by 15-20 in. strips of contrasting fabric.  Cut one of the long ends with pinking shears to prevent fraying.

DSCN3152
Using the longest stich on your sewing machine, and light tension, sew about 1/4 in. from the straight edge on all three strips.

DSCN3153
Pin both short ends of first strip 1.5 in. from the center fold, making sure the straight edge is closest to the fold and the fabric is right-side-down. (I learned on my THIRD ruffle that it was easiest to draw a line in pencil and pin the ruffle to line up with it.)

DSCN3154
Pull the top thread on each side to gather the fabric. Once the tread is taught, tie the two strings at each end so the treads don’t slip when you move the fabric.

DSCN3155
Spread out the ruffle so it is evenly disbursed across the canvas and pin in place.

DSCN3156
Sew the ruffle down using a seam allowance a little less than 1/4 in (don’t forget to change the stich length and tension on your sewing machine back to your normal settings).

DSCN3157
Remove pins, fold ruffle down toward the fold and pin down.

DSCN3158
Topstitch the ruffle down to hold it in the right direction and better secure it. Remove pins and pick out the stitch used to gather the ruffle.

DSCN3159
Repeat with the next two ruffles, only attach them 1.25 in. from the first ruffle instead of 1.5 in.

DSCN3162
After all three ruffles are attached, your bag will look like this.

DSCN3163
Pin the fabric together (folded at crease) with wrong sides together. Make sure to pin ruffles down so they don’t get caught when you sew the sides.  Start seam 2 in. from the top, and using a 1/4 in seam allowance, sew all the way to the bottom fold. Repeat on the other side.

DSCN3167
Turn bag inside out, push our corners and sides and pin together. Sew both sides with a 3/8 in. seam allowance.

DSCN3168
When turned right-side-out, your bag should resemble this picture.

DSCN3169
While bag is inside-out, snip to the seam, 2 in. from the top where you started the side seam.

DSCN3170
It should look like this.

DSCN3171
Fold the flap in, so the raw edge meets the side seam, and then over once more so  the folded edge is even with the side seam. iron down and repeat with all four corners.

DSCN3172
Top stich the edge in place.

DSCN3173
Fold the top edges over 1/4 in. and iron down.

DSCN3174
Then fold down about 1 in. so the folded top edge covers the snipped edge of the side seam and iron in place.

DSCN3176
Pin down corners, and along the top, so the fabric will stay in place. See how the top is folded over the snipped side seam?

DSCN3177
Sew all the way around the top, using a 7/8 in. seam allowance, to create a sleeve for your drawstrings.
Almost done!

DSCN3178
Pull the bottom ruffle away from the corners and pin the corners in place.

DSCN3179
Sew diagonally across the corners to form a triangle on each side.  Sewing complete!

DSCN3180
Add a grommet in each corner. Follow the instructions on your grommet tool.

DSCN3181
Thread one cord through the front sleeve, and then back through the other sleeve in the other direction. You should have a loop on one side, and two ends on the other side. Repeat with the other cord, starting on the opposite side, so the you have a loop and two ends on each side.

DSCN3182
Thread both ends through the grommet on the corresponding side and tie a know in the end. The knot should be bigger than the hole in your grommet.

DSCN3184
And that’s it! Easy right?

When you pull the cord on both sides of the bag, the top will cinch and the cords will form the straps.

I have to say, the ruffles were the hardest and most time consuming part, but SO worth it!

DSCN3186
And how bright and cute is that? Not that she needs any more color added to her wardrobe today….

DSCN3211


Good news is: she loves it!

The better news? I made two.  One for my little lady and one for a lucky winner.  To enter my very first giveaway, go to this post, and follow the directions! Good luck!

 I'm sharing this project at:
The Train to Crazy
The Shabby Chic Cottage
Chic on a Shoestring
Naptime Crafters
Tatertots and Jello
The Shabby Nest
Be Different Act Normal
Thrifty Nifty Things
Running with Glitter
So I Married a Craft Blogger